“The ring cracked during installation. We need to know why.”
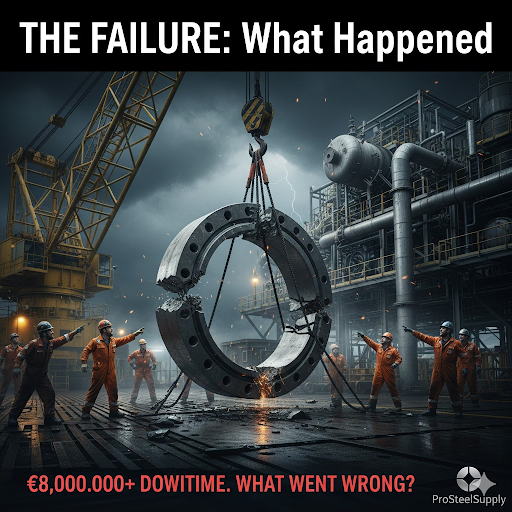
The call came at 6 AM. A 4-meter duplex ring. €65,000. Cracked while being lifted into position on an offshore platform. The installation vessel was on standby at €900,000 per day. The project was stopped.
We had the failed component shipped to a metallurgical lab. Three weeks later, we had answers. And they weren’t what anyone expected.
After 30 years coordinating forging supply chains, we’ve investigated dozens of failures. Some are obvious. Most aren’t. All are expensive.
This article walks through a real forging failure, explains what failure analysis revealed, and shows how proper quality control and process control prevent similar problems.
North Sea offshore platform. Main process manifold installation. A large duplex stainless ring connecting two pressure vessels.
The component had been delivered six months earlier. It sat in storage at the fabrication yard. All documentation was in order. Material certificates showed full compliance. Dimensional inspection passed. Third-party DNV inspection witnessed and approved.
During final assembly, the ring was lifted by a four-point sling. As it cleared the deck, a loud crack. The ring fractured completely through one section.
The damage:
What went wrong?

Failure analysis follows systematic steps. Skip steps and you miss the root cause.
First step: Look at the fracture surface. Document crack location, orientation, and appearance.
What we found:
These observations told us: The crack didn’t start during lifting. It started earlier from an internal defect. The lifting load was just the final stress that caused complete fracture.
Second step: Cut sections through the fracture origin. Prepare metallographic samples. Examine under microscope.
What metallurgy revealed:
The inclusion acted as a stress concentrator. During heat treatment, the temperature gradient around the inclusion created residual stress. The lifting load exceeded the local strength and the component fractured.
Third step: Verify material composition matches specification.
Results:
Material selection wasn’t the problem. Material quality was.
Fourth step: Test mechanical properties from various locations in the component.
Results:
The bulk material was fine. The inclusion was the problem.
The failure resulted from a large non-metallic inclusion in the steel. This inclusion:
The root cause: Inadequate quality control at the steel mill and inadequate defect detection during forging production.
Steel contains non-metallic inclusions from the melting and refining process. Oxides, sulfides, silicates. These are unavoidable at microscopic levels.
Small, well-distributed inclusions don’t significantly affect properties. Large inclusions are dangerous.
During steelmaking, impurities are removed by oxidation and slag formation. Some oxide particles remain trapped in the solidified steel.
Modern steelmaking reduces inclusion content through:
But large inclusions occasionally escape detection. Especially in large ingots for forging stock.
The forging process deforms the steel. Large inclusions should be broken into smaller particles and distributed throughout the material.
Proper forging requires:
In this case, the forging reduction was marginal. The 4-meter ring was forged from a relatively small starting billet. The inclusion survived intact.
Ultrasonic examination detects internal defects. Sound waves reflect from density discontinuities like inclusions, porosity, and cracks.
Standard ultrasonic inspection should have detected an 8mm inclusion.
What went wrong: The inspection was performed but the technician missed the indication. Possible causes:
Failure analysis couldn’t determine which. But the result was clear: a critical defect reached the customer undetected.
This failure resulted from multiple quality control failures at different stages.
The steel mill should have:
Apparent gap: Either testing wasn’t performed or defect was missed.
The forge should have:
Apparent gap: Ultrasonic inspection was performed but the defect wasn’t detected or wasn’t evaluated as rejectable.
The customer’s receiving inspection should have:
Apparent gap: Documentation review didn’t identify any issues with the original inspection results. Independent testing wasn’t performed.
Multiple checkpoints failed. Any one functioning properly would have prevented the failure.
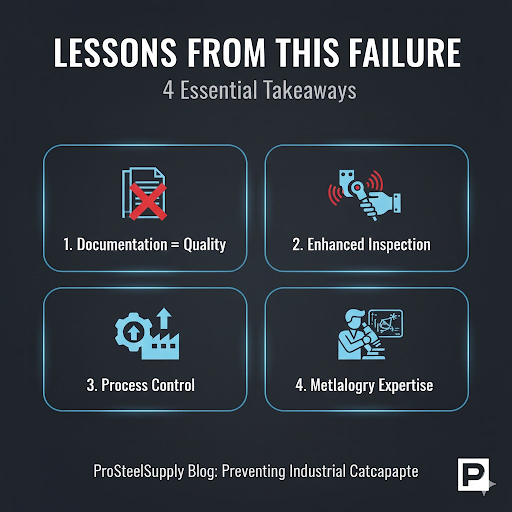
Every failure teaches lessons if you’re willing to learn.
This forging had perfect paperwork. Material certificates. Dimensional reports. Third-party inspection sign-off.
The defect was still there.
Documentation proves process was followed. It doesn’t prove the component is defect-free. Critical components need verification beyond document review.
Standard ultrasonic inspection follows general procedures. Sensitivity levels. Scan patterns. Acceptance criteria.
For critical applications (offshore, pressure vessels, safety-critical), enhanced inspection is justified:
The incremental cost (€2,000-5,000 for enhanced inspection) is negligible compared to failure consequences.
Quality control catches defects after they’re created. Process control prevents defects from forming.
Better process control would have prevented this failure:
Steel mill: Enhanced inclusion control in steelmaking. Ultrasonic testing of all large ingots before shipping.
Forge: Higher forging reduction ratio. Multiple inspection stages during production rather than only at completion.
These process improvements cost money. But they prevent expensive failures.
Proper failure analysis requires metallurgical expertise. Understanding microstructures. Recognizing defect types. Interpreting fracture surfaces.
Without expertise: “The forging cracked. It must have been bad material.”
With expertise: “Large oxide inclusion survived forging due to inadequate reduction. Inspection missed it due to procedural gaps. Here’s how to prevent recurrence.”
This knowledge prevents future failures.

Preventing failures requires systematic approaches at multiple stages.
Specifications must address:
Vague specifications like “per industry standard” leave gaps. Be specific.
Supplier qualification should verify:
Don’t assume capability. Verify it through audits and trial orders.
Inspect at multiple production stages rather than only final:
This catches defects early when correction is less expensive.
Match inspection methods to defect types:
For critical components, multiple methods provide better coverage than single method.
After 30 years coordinating forging supply chains, we’ve learned how to prevent failures.
Our Supplier Qualification Process:
We qualify forges through on-site audits, process control review, trial orders with enhanced inspection, and ongoing performance tracking. Only forges that pass enter our network.
Our Quality Control Approach:
We implement quality control beyond standard requirements. Incoming material verification. In-process inspection at critical stages. Enhanced ultrasonic examination for critical components. Independent third-party verification when specified.
Our Failure Analysis Support:
When problems occur, we coordinate investigation. Arrange shipping to qualified metallurgical labs. Manage failure analysis process. Identify root causes. Implement corrective actions with forge.
We don’t hide from failures. We learn from them and prevent recurrence.
Our Process Control Focus:
We work with forges to improve process control. Review and optimize forging parameters. Implement statistical process control. Establish in-process inspection checkpoints. Verify heat treatment through metallography.
Prevention through better processes costs less than detection through more inspection.
Forging failures are expensive. Direct costs (replacement components, investigation) are substantial. Indirect costs (project delays, vessel standby, reputation damage) are often 10-100 times larger.
Most failures are preventable. They result from:
The solution isn’t just more inspection. It’s better processes, clearer specifications, qualified suppliers, and proper expertise throughout the supply chain.
Yes, enhanced quality control costs more upfront. Supplier audits, staged inspection, metallurgical verification all add expense.
But compare these costs to failure consequences. €5,000 in enhanced inspection versus €8 million in project delay. The math is clear.
Need forgings where failure isn’t an option? ProSteel Supply coordinates quality-critical forging supply daily. We qualify suppliers properly. We implement appropriate quality control. We have metallurgy expertise to prevent problems and investigate when they occur.
Contact us for quality-critical forging guidance. Because in offshore and energy projects, the forging that fails costs more than the forging that works.
Offshore wind platforms face the most aggressive environment forgings encounter. Seawater corrosion. Cyclic fatigue. Temperature extremes. Limited maintenance access.
Normal industrial forgings fail in this environment. Proper offshore engineering, rigorous component testing, and proven fatigue resistance are mandatory.
Yes, offshore-grade forgings cost more than industrial-grade. Yes, testing adds time and expense. Yes, documentation requirements are extensive.
But offshore failures cost orders of magnitude more. A €50,000 forging that fails creates €5-10 million in replacement costs.
The forgings that survive 25 years offshore aren’t the cheapest forgings. They’re the forgings designed, tested, and manufactured specifically for offshore conditions.
Need forgings for offshore wind projects? ProSteel Supply coordinates offshore forging supply daily. We’ll specify materials that survive. We’ll coordinate testing that proves performance. We’ll deliver forgings that last 25 years.
Contact us for offshore forging guidance. Because in offshore wind, the forgings that fail cost more than the forgings that work.

Download our whitepaper and gain practical insights into materials, quality, and supply reliability.